Before & After: A Crash Pad in Paris Reworked for a New Life
This makeshift pied-à-terre in France became home sweet home thanks to a few decor tricks and a new layout

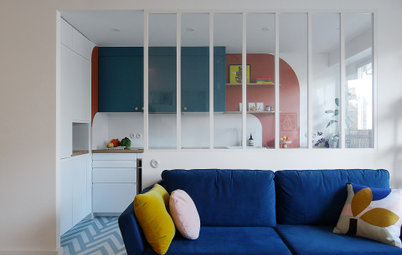
A management consultant bought this studio apartment in the ninth arrondissement of Paris, France, with the intention of living here for part of each week. The space is on the eighth floor and faces the inner courtyard of a building dating to the ’70s. It had recently been renovated, so the owner only needed to refresh the floor and put in a mattress and small sofa. However, when she decided to leave her house outside the city and move into the studio permanently, she decided to rethink the layout and decor.
The owner had managed home renovations in the past, but rethinking such a small space for comfortable everyday living is a different story. Realising she needed help from a professional designer, she contacted an architect who directed her to interior designer Aude Groshaeny of Décodage Création.
The owner had managed home renovations in the past, but rethinking such a small space for comfortable everyday living is a different story. Realising she needed help from a professional designer, she contacted an architect who directed her to interior designer Aude Groshaeny of Décodage Création.
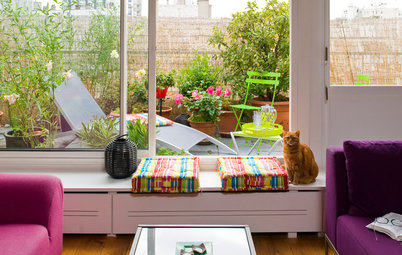
Before. The apartment was already reasonably well laid out, with the plumbing for the kitchen and bathroom at the entrance, and an approximately 20-square-metre living area, which opens up to a balcony with a clear view over the inner courtyard and the city rooftops. The apartment also came with several good-quality custom-made cabinets.
When the owner purchased the property, she simply installed oak laminate flooring and popped her mattress on top. For the living room, she bought a sofa and an armchair.
When the owner purchased the property, she simply installed oak laminate flooring and popped her mattress on top. For the living room, she bought a sofa and an armchair.
The floor plan before works
Struggling with a small floor plan? Find a local interior designer for customised space and storage design
Struggling with a small floor plan? Find a local interior designer for customised space and storage design
After. “The owner came to me with a budget of €20,000 [approximately AUD$32,000] to optimise the space, with the bedroom area being the priority,” says Groshaeny. “She also wanted a proper dining area for possibly inviting guests over, and also sought to bring some light into the kitchen, which looked like a dark hallway. Storage was the final problem.”
The floor plan after works
Before. The owner had already decided she didn’t want to use a sofa that needed to be unfolded into a bed every night, and preferred to lay a mattress on the floor along the kitchen wall.
After. “It was a priority for the owner to have a real bedroom in the living area,” says Groshaeny. “She shared her idea of using openwork panels and immediately realised that she wanted to incorporate beautiful materials. We saw that her budget wouldn’t be enough, so she decided to extend it.”
A three-dimensional render of the new floor plan
The bathroom, which can be accessed from the entrance (not pictured in this render), was in very good condition and wasn’t changed during the renovation. The kitchen, which had been fitted recently, also remained in place.
Groshaeny’s biggest task was to create a pleasant bedroom area that measured approximately 1.5 x 2 metres. Adjacent to the living room, it was partitioned using sliding geometric room dividers.
Before. The original kitchen looked like a narrow hallway with no natural light. Groshaeny saw an openwork ‘cocoon’ as a great opportunity to brighten the space.
After. Removing part of the wall between the kitchen and living room allowed her to place room-dividing panels on three sides of the bedroom. Now, natural light from the balcony door filters right through to the kitchen.
“The kitchen was not essential for the owner. Most of the time she just uses it to make coffee or warm up some food. Still, we placed a pane of glass on the kitchen side of the partition to prevent grease and odours [from getting into her room],” says Groshaeny.
To achieve a more spacious feel, Groshaeny added about 20 centimetres of ceiling height by removing the old air conditioning system and the ’70s panelled drop ceiling that concealed it.
To achieve a more spacious feel, Groshaeny added about 20 centimetres of ceiling height by removing the old air conditioning system and the ’70s panelled drop ceiling that concealed it.
Elm Bat carried out the work on the ceilings, while carpentry firm Hopfab made the custom timberwork. “I spotted them long ago on Houzz because of their creative projects, which have a contemporary feel, but I was waiting to have a major project to offer them,” says Groshaeny. “They didn’t disappoint! Without them, my drawing couldn’t have come to life.”
The bedroom area, which sits to one side of the living room, is the heart of the apartment.
The timber panels were placed on approximately 90-centimetre-tall plaster supports. “It’s raw pine on the living room side and white-painted MDF on the kitchen side,” says Groshaeny. “As I wanted the panels to be flush with the 72-millimetre-thick wall, the uprights were cut from massive pine pieces. To avoid it looking too regular, like prison bars, 11-millimetre-deep niches were added to animate the set-up.”
The timber panels were placed on approximately 90-centimetre-tall plaster supports. “It’s raw pine on the living room side and white-painted MDF on the kitchen side,” says Groshaeny. “As I wanted the panels to be flush with the 72-millimetre-thick wall, the uprights were cut from massive pine pieces. To avoid it looking too regular, like prison bars, 11-millimetre-deep niches were added to animate the set-up.”
The bedroom is accessed through two 74-centimetre-wide sliding doors attached to a rail at the top, which creates two entry points. “They make it possible to get out from either side of the bedroom, which can be quite practical,” says Groshaeny.
Downlights have been integrated into the dropped ceiling over the bedhead, while an enclosed shelf (measuring 16-centimetres deep and 92-centimetres high) offers open and closed niches that double as bedsides.
The 60-centimetre-high bed is supported by a slatted frame. Two roller drawers fit inside to store bed linen and extra blankets.
“They are 110 centimetres long and have been calculated to the last centimetre so that, when opened, they fit under the grey cabinets opposite the door to the bedroom area,” says Groshaeny of the built-in joinery on the opposite side of the hallway.
“They are 110 centimetres long and have been calculated to the last centimetre so that, when opened, they fit under the grey cabinets opposite the door to the bedroom area,” says Groshaeny of the built-in joinery on the opposite side of the hallway.
Once the problems of the bedroom area and kitchen lighting were resolved, Groshaeny moved on to the next challenges: the dining area and storage.
“We kept the original cabinets – which were well designed – as much as possible, particularly at the entrance and the floating cabinets in the living room,” says Groshaeny.
“We used shallow, 16-centimetre-deep cupboards to extended the line of the openwork room to form an L-shape up to the glass doors. Crockery is stored here. To make it visually lighter, the carpenter created faux drawers by cutting grooves in the MDF and then painting them. We finished off the look with leather handles and wallpaper.”
It took some time to come up with a plan for the dining area. “It had to be pretty and, especially, easy to handle because the owner did not want something that would be cumbersome to open and stow,” says Groshaeny.
“We thought about several mechanisms before going with this table, which has feet that unfold like the wings of a butterfly. Guides at the top bring them to a stop, and it’s not necessary to manually support the top while opening it as the whole thing supports itself throughout the process.”
“We thought about several mechanisms before going with this table, which has feet that unfold like the wings of a butterfly. Guides at the top bring them to a stop, and it’s not necessary to manually support the top while opening it as the whole thing supports itself throughout the process.”
The owner decided to treat herself to two iconic TS chairs by French designer Roger Tallon. These are a reissue of the original folding chair from 1977. She bought them at Sentou for about AUD$380 (€240) each. She has no regrets and feels that a small space always makes a bigger impact if it has one or two classic pieces of furniture.
“It was an ideal project that appealed to my favourite part of my profession: a little hard work instead of a hardcore renovation, allowing me to focus on space optimisation and aesthetic creativity,” says Groshaeny.
Your turn
Which savvy space-saving solutions do you like in this redesigned apartment? Tell us in the Comments below, save the images for inspiration, like this story, and join the conversation.
More
Fancy another dose of French design inspiration? You’ll love this Before & After: Parisian Elegance in a Revamped 1800s Apartment


Gesponsert
Laden Sie die Seite neu, um diese Anzeige nicht mehr zu sehen
Houzz at a Glance
Who lives here: A management consultant
Size: About 30 square metres
Location: Paris, France
Completed: July 2019
Duration of work: Five months
Interior designer: Aude Groshaeny of Décodage Création
Builder: Elm Bat
Carpenter: Hopfab
Budget: About AUD$56,600